As a major part of our rebrand of Spangles in this university project, we need to do a game. Our idea, as you may have seen, was a Sonic-like game with Total Wipeout tendencies.
But of course, every game needs to start somewhere, so we’re in the process of making some prototypes in Unity 3D. They aren’t the most riveting of elements, but it’s only the building blocks.
We’ve taken a few of our steps alongside some elements talked about in Unity’s 2D Gameplay Tutorial, with such things like the death area and prefab panels, but we’ll come to those in a later post.
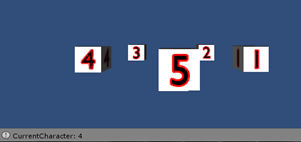
The game starts with the character selection screen. Our game allows you to play as five fruits competing to be the new flavour in a packet of Spangles. We’ve got a GameObject which contains five numbered cubes (placeholders for when we get the characters made). The cubes are numbered 1-5, but internally referenced as 0-4. Bit of an oversight on my part, I apologise.
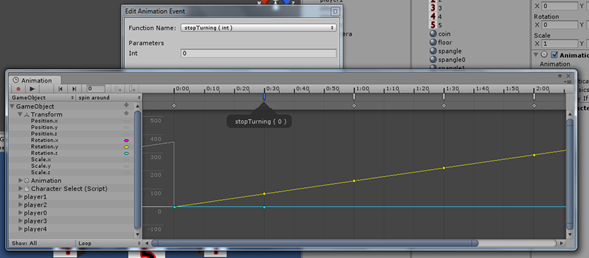
The GameObject has a rotation animation on it, which is designed to stop as each cube hits the foreground. Basically, it rotates 72 degrees and stops in whatever direction you push on your keyboard.
static var currentCharacter : int = 4;

function Start() {
  animation["spin around"].speed = 0;
}

function Update() {
  if (Input.GetKeyDown("left")) {
    Debug.Log("LEFT");
    startTurning("left");
  } else if (Input.GetKeyDown("right")) {
    Debug.Log("RIGHT");
    startTurning("right");
  }

  if(Input.GetButtonDown("Jump")) {
    startTheGame();
  }
}

function stopTurning(characterNo : int) {
  if(characterNo != currentCharacter) {
  animation["spin around"].speed = 0;

  if (currentCharacter < 4) {
    currentCharacter++;
  } else {
    currentCharacter = 0;
  }

  currentCharacter = characterNo;
  Debug.Log("CurrentCharacter: " + currentCharacter);
  }
}

function startTurning(theDirection:String) {
  //animation.Play("spin around");
  if (theDirection == "left") {
    animation["spin around"].speed = -1;
  } else if (theDirection == "right") {
    animation["spin around"].speed = 1;
  }
}

function startTheGame() {
  Application.LoadLevel("test");
}
Lots of friendly code, there. But I’ll explain it somewhat.
We’ve got a variable called currentCharacter which stores the number of the Spangle chosen. It defaults to 4 because of where the animation starts.
As said before, the spinning is done through the Animation window. It cycles through 360 degrees in about three seconds, although those measurements aren’t to be relied upon. Every 72 degrees (as in, every point the a Spangle is in the foreground) a function is triggered. This function – stopTurning – does exactly that and stops the animation if need be.
Functions run by the left and right arrow keys move the character wheel left and right.
Both of the above functions – stopTurning and startTurning – contain a line of code that relates to the animations speed. animation["NAME"].speed is used to access the speed the animation ‘NAME’ plays. A value of 1 is normal, straight speed (in this case, spinning to the right). A value of 0 is, therefore, paused. –1 is normal speed, but played backwards (in this case, spinning to the left).
Finally, the function startTheGame() starts the game when the user has made a choice, which is denoted by pressing the spacebar. This then loads the next scene, which contains our game. Our currentCharacter variable is a static, global variable, so we can grab it when needed. Regardless of when the user presses the spacebar, we still have a value to send.
And that’s it, really. That’s a simple, old-school character selection for you. Of course, this is bare bones work here. Nothing exciting happens. We’ll continually develop it when we find more things to add to it, so don’t take this for gospel, but feel free to pick bits and pieces for your own work. :)

